Periodically, people have trouble printing the pattern off from Scribd. Scribd told me a couple of years ago "This was a known issue that our development team has recently resolved. If you continue to encounter this issue, please let [us] know. " It appears that a few people are still not able to print so they have asked me to say that if you do have trouble please contact them directly so they can help you and/or email me at the address listed in my contact details, specify if you want A4 or US letter, and I'll send you the file asap.
The Hazelnuts Felt Bunny
The Hazelnuts Felt Bunny

This pattern is my attempt to recreate two felt bunnies my brother and I were given back in the early 1970s. Apparently my grandmother also used to make similar bunnies in the 1950s in New Zealand, so I was keen to resurrect this pattern and make it available to others. The pattern and this tutorial are protected by an Attribution-Noncommercial-Share Alike 3.0 New Zealand License, details can be found at the end of this tutorial.
A4 paper: Tutorial and pattern 464KB
US letter: Tutorial and pattern 470KB
MATERIALS
• One piece of darker felt approximately 25cm (10”) wide and 23cm (9”) high for main body.
• One piece of lighter felt approximately 15cm (6”) by 18cm (7¼“) for tummy and inner ears.
• Embroidery thread
• Stuffing
• Thick yarn for pompom tail
CONSTRUCTION STEPS
1. Print out the pattern. Make sure your printer isn’t scaling it to fit the paper and that the square on the pattern measures 1cm square (just over 3/8”)
2. Cut out the following pieces (I find it easiest to trace around the pattern pieces and then cut):
Darker felt
2x Body
1x Head gusset
2x Ears
Lighter felt
1x Tummy cut on fold (or retrace with two halves together to form new pattern piece)
2x Ears

The more accurate you are at cutting, the better the bunny will fit together. If the pieces deviate during stitching, just trim any excess away to get a good match between pieces.
If you want extra embellishments on the bunny (see last step for one idea), do this now before sewing it up.
3. The cross stitch will hold the two pieces together securely, although the distance you set it back from the edges will depend on how sturdy your felt is. Pure wool felt is less likely to rip out than a blended or purely synthetic felt, so judge accordingly. For this demo rabbit, I’ve used pure wool felt and the stitches are generally 2mm from the edge (just over 1/16”) and 3-4mm wide (approx. 1/8”). I do half the cross all the way up one side…


4. Begin by stitching the darker body pieces to the lighter tummy, one side at a time.

5. Stitch the two body pieces together at centre back from the bottom, ending at the point marked on the pattern for the stuffing gap (see photo on right below).
6. Then attach the head gusset beginning at the insertion point (A) marked on the pattern. In this example I started on the left side but it doesn’t really matter. Begin at Point A and stitch half crosses all the way to the end of the gusset piece and then return (steps 1 & 2). When you get back to Point A keep going down towards the top point of the tummy and then back up (steps 3 & 4). Stitch up the other side of the gusset and then back again (steps 5 & 6).
For steps 5 & 6 continue past the head gusset to the top point of the stuffing gap, sewing the two body pieces together at centre back. See photo below.


7. Place the dark and light ears together and cross-stitch around the edges, leaving the bottom free. Fold the ear in half lengthwise with light felt inside. Using sewing machine thread that matches the darker body felt, whip stitch the cross-stitched edge at the base up to the dashed line on the pattern (1cm), as well as the bottom edge. Make sure that the outer felt is level with, or slightly longer than, the inner so that it’s not sticking out when you sew the ears on. For example, I trimmed off the excess white at the bottom of the left ear.

8. With your fingers, gently pull the felt apart on either side of all the seams to flatten them out. You can also press the seams between your fingers. The seams will inevitably be ridge-like initially, but as the bunny is played with, squashed, and generally loved, they will work themselves flatter and flatter.
9. Stuff the bunny firmly with your choice of fill. Be careful not to stretch out the felt around the gap as you stuff. I’ve always used polyester fibrefill, but I suspect that wool rovings would be ideal in achieving a firm stuff. Pay particular attention to getting the paws and legs full. The initial firmness is essential because as the seams flatten out and give a bit the bunny will soften up. Sew up the stuffing gap, matching the stitches to those already there for a seamless look.

10. Attach the ears on using the same thread you sewed them with in Step 6. I position them so the ear’s folded area ends at the head side seam so I can attach them really firmly at this point. The rest of the ear is whip-stitched through the head felt and some of the stuffing if I can catch it (for added stability). The actual ear position is up to you – this is where your bunny starts to express its personality!


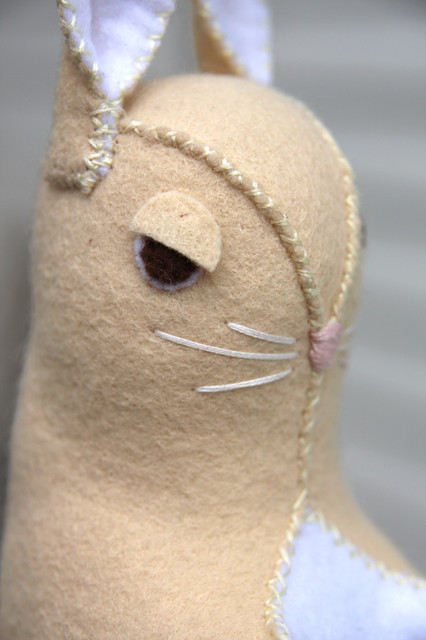
11. Cut out eyes from scraps of felt, I’ve used pure white and black. I used a regular hole punch for the black and cut the white slightly larger. Sew the black pupil on to the white, ad then both onto the bunny. Again, the eye placement is up to you, where you put them really gives the bunny its character so play around for awhile to get them just right.

12. Embroider on nose and whiskers. I’ve used the same embroidery floss I did to sew up the bunny. The nose is a simple satin stitch over the V formed by the head gusset and body pieces. To do the whiskers make a small knot at the end of a good length of floss and insert the needle into the seam near the nose, pushing it between the two layers of felt and out at the beginning of the first whisker. With a bit of gentle pulling the knot should pull through, get caught in the stuffing and hold firm. Sew the whiskers as desired. On the last whisker, determine the desired length and tie a small knot in the floss just fractionally past that point. Insert the needle at the whisker endpoint and down into the stuffing, emerging from the felt a distance away. Gently pull on the floss until the knot pops through the felt. Keeping tension on the floss, trim it close to the surface and it will slip back beneath the felt.

13. Make pompom for tail. I’ve included the template for the tail on this bunny, but it is a big one, so if you want a less luxurious version, adjust accordingly. If you weren’t a kid like me who made, what from memory seems to have been endless numbers of pompoms (Why? What for? Where did they go? It’s a mystery), I suggest this little tutorial over at Kid Craft Central. If you were like me don’t worry, it’s like riding a bike and it’ll come back as you go! Leave long tails on the wool you use to tie it off with so you can attach it easily to the bunny.
14. Attach the tail to the bunny butt. The tail is not only bunny’s pride and joy, it helps to keep it sitting up straight, so needs to be in the right spot to stop bunbun keeling over backwards or tipping forwards. That position will depend on your individual bunny and the pompom size. Once you’ve got that sorted thread a needle on to one of the long tails of the pompom and push it through from one side of the central seam to the other. How far out from the seam you start really depends on the size of the tail, but you want to make sure you’ve got a decent amount of felt and stuffing included, but not so much that when you pull tight the felt puckers. Do the same for the other long tail, putting it through just above or below the first one. Tighten until the pompom is firmly against the bunny and tie the two tails together with a granny knot or two, and trim the ends.

Congratulations! You’ve finished your bunny!
15. Extra embellishments
One of the original bunnies had felt flowers appliquéd on its back, reproduced here on another bunny I did.

I cut the petals and flowers freehand, you can see the various shapes and embroidery in these photos. The single flower on the right was attached all the way around with blanket stitch, with a stem stitch stem and satin stitch centre. It sits in the lower half of the left side of the back (sorry I don't have a photo of it in situ). The multi-petalled flower had petals held down at the base with a triangle of straight stitches and French knots in the centre. The leaf was done the same as the petals. The other type of flower, seen only on the top of the left photo and on the bunny above, were cut from one piece of felt and had a few straight stitches in the middle to hold them down.


If you'd like to customise your bunny eyes a bit more, see my post on it here
Final note: If you don’t feel like all this hand sewing, the pattern would also work well if you added a seam allowance to all the pieces and used a sewing machine. Use lighter fabrics than felt, and clip the curves religiously.
Please share a photo or two of your finished bunny at the Hazelnuts Felt Bunny Flickr group
I’d love to see what you come up with.

The Hazelnuts Felt Bunny by Jacqueline Craig is licensed under a Creative Commons Attribution-Noncommercial-Share Alike 3.0 New Zealand License.
Permissions beyond the scope of this license may be available at http://www.hazelnutgirl.blogspot.com/.
To paraphrase the CC explanation: This licence lets others remix, tweak, and build upon my work non-commercially, as long as they credit me and license their new creations under the identical terms. All new work based on mine will carry the same licence, so any derivatives will also be non-commercial in nature.
Thank you so much for the tutorial! :) I *love* this bunny--I can't wait to try to make one of my own!
ReplyDeleteOh, man, that is CUTE. You're starting to make me want to learn how to quilt and make adorable little things like this bunny!
ReplyDeleteholy crap that bunny is awesome!
ReplyDeleteFun! Can't wait to try this!
ReplyDeleteThank you so much Jacqui. I've been browsing Softie patterns and this bunny really stands out
ReplyDeleteThanks for all the lovely comments! :) It's nice when others love the bunny as much as I do.
ReplyDeleteThanks so much for sharing this gorgeous pattern. This bunny is a real sweetheart :)
ReplyDeleteI love this pattern! Usually, I do a blanket stitch when I make something with felt but I like your idea of cross stitching. I'll have to give that a try. Thank you for sharing your bunny pattern!
ReplyDeleteHi Patty! Blanket stitch would be an interesting one, I hadn't thought of other stitches! Frankly my cross stitching is far better than my blanket stitching, I have a heck of a time getting my stitches even doing that, not sure if it's lack of practice or if it's just more unforgiving :) I usually end up having to mark the stitches with a water-erasable marker which is a bit time-consuming.
ReplyDeleteawwwwwww!! these are SO SO cute!! i think i might have to try my hand at one..
ReplyDeleteThis is adorable! I'm saving this to try some time. Or to just look at and enjoy.
ReplyDeleteI posted this adorable bunny tutorial on Craft Gossip Felting and I hope you stop by and leave a comment. http://felting.craftgossip.com/2010/03/05/hazelnut-felt-funny-tutorial/
ReplyDeleteUnable to get pattern pieces to print.
ReplyDeleteSo adorable! I can't wait to try this. Thanks for sharing with us.
ReplyDeleteThis is amazing! I can't wait to make a bunny of my own(and some for my family and friends).
ReplyDeleteI love this bunny! I want to make one for each of my kiddos! I posted a link to this tutorial on my website that features free felt patterns by very talented people!
ReplyDeletehttp://www.redroofpatterns.com/2011/03/free-hazelnuts-felt-bunny-pattern.html
Aww thank you! You really made my day :)
ReplyDeleteI made this bunny at school in the 1970's! I still have it and it comes out every Eastertime to welcome Spring. I believe it was from a Dryad pattern, in the UK. I hand stitched mine and it is black with a white tummy. I love yours with flowers on. Gill.
ReplyDeleteThat's so exciting to know, thanks for providing a piece of the puzzle Gill! The date would probably be about right for my original bunnies too. The funny thing is that last year sometime I went looking online to see if I could find anything similar and came across a couple of Dryad books that had very similar soft toys and I thought about buying them but they were a bit expensive. I must go looking for them again! It would be interesting to compare the original pattern to the one I drafted off a very loved, old and distorted bunny.
ReplyDeleteI've made it. I remember my big sister making one of these at school, years ago. Couldn't resist making my own. I've posted it up on my blog and I'll add an image or two to your flickr group. Thank you. I had fun making this, with your template.
ReplyDeleteThanks so much for sharing this! its absolutely adorable! I've made my own, I've put a picture up on my blog at www.handmaderaspberry.wordpress.com, with a link back to your blog. Thanks Again!
ReplyDeleteYou're very welcome and thanks for letting me know about your bunny - it's lovely!
ReplyDeleteVery cute bunny! Thanks for the pattern! I made one yesterday and added him to the flickr group pool and he's on my blog too, http://mildlycrafty.com/2012/04/im-making-something.html
ReplyDeleteI have mad a bunny from your pattern, but I cannot get the arms and feet to stay stuffed, help!
ReplyDeleteHi Jenna,
ReplyDeleteThe arms and legs can be tricky because they are so small. I know I've felt mine weren't as full as they could be sometimes. I'm not a stuffing expert, but the trick is to stuff using smaller lumps rather than trying to get big amounts in all at once. I start with the feet and, using a blunt-ended chopstick, put in small amounts and get them stuffed as much as possible before starting on the body. It can be a bit of a balancing act because the feet might not stay stuffed unless there is a bit of stuffing in the body to sort of hold it in. If you've used small bits though, you can still manipulate them with body stuffing present. When you've stuffed the body firmly up to the level of the arms then do them and keep going.
Hope that helps!
--- Sent from my iPhone ---
thank you so much for the tutorial! They were fun to make and great gifts to
ReplyDeletegive on easter :)
Thank you very much for sharing this pattern and tuto !!
ReplyDeleteI made mine with plaid pattern and upload here -->> http://wafflepatterns.tumblr.com/
thanks again !
I have just started sewing and think I might try this cute little bunny as I come from a cross-stitching background!
ReplyDeleteI have one question - when you mention making the bunny with a sewing machine, you say to "clip the curves" - is this a technical term, or do you mean to keep the fabric neatly trimmed?
Thank you very much for posting this lovely pattern!
Hi,
ReplyDeleteGlad you're going to give the bunny a go! Clipping curves is a sewing term and it's how you get seams to lie smoothly around curves instead of going all bumpy or pulling. Instead of trying to explain it myself it might be easier to have a look at this tutorial which describes it really well. http://www.sewmamasew.com/2011/10/the-hows-and-whys-of-clips-and-notches-sarai-mitnick-colette-patterns/
Jacqui
Absolutelly lovely, turned out great! Thank you!
ReplyDelete