This is my first attempt at a tutorial so I'd love feedback and constructive criticism (and I do mean that!) Please let me know if you have any problems with downloading the files, it's all new territory for me!
-------------------------------------------------------------------------------------------------------
-------------------------------------------------------------------------------------------------------
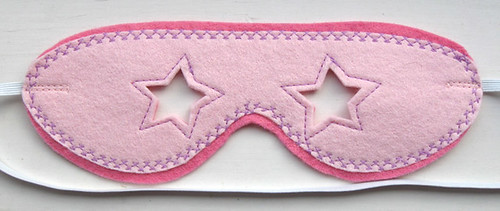
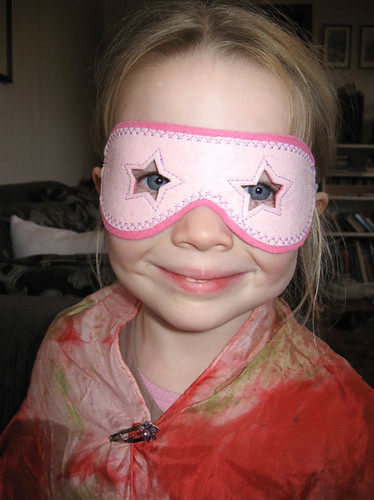
CHILD’S FELT MASK
This is a very quick tutorial and pattern for a child’s felt mask.
Get the full tutorial and pattern as a .pdf here, or just the pattern here.
Get the full tutorial and pattern as a .pdf here, or just the pattern here.
There are lots of great mask inspirations on the internet so I highly recommend it as a resource. I got the idea for star eyes from Creative Kids at Home and their paper masks, as well as ideas from googled images of felt masks, some of them are quite wonderful! Tutorials on making felt crowns, such as the one at Juicy Bits are also a great source of ideas for embellishments and construction techniques.
MATERIALS
- Two pieces of felt approximately 20cm (8”) wide and 9cm (3 ½”) high. Iron before cutting to avoid shrinkage when fusing together
- 1 piece WonderUnder (or similar) to fuse felt together (optional)
- Elastic (I used approx. 37cm of 5mm elastic (14” of ¼”))
- Thread for decorative stitches
CONSTRUCTION STEPS
- Print out the pattern and test for size on your child. You may need to move the eyes further apart, closer together, make them bigger, or make it a bit wider. Test this with paper first before committing to a felt version.
- Note: the pattern is designed to print out on A4 paper size. If you are printing on US letter it should be fine, just make sure your printer isn’t scaling it to fit the paper and that the square on the pattern measures 1cm square (just over 3/8”)
- Decide which colour felt will be the bigger outer piece and cut it out approximately 5mm larger than the pattern all the way around, curving it in at the temples to match the pattern (see image above). Having two even layers of felt at this point provides more stability for the elastic. Do not cut out eyes at this point.
- Cut out smaller upper piece of felt, following pattern exactly. Optional step if using WonderUnder: In order that the felt of the smaller upper section fuses well along the edges, iron the WonderUnder to the whole piece following manufacturers instructions and then cut out the pattern. You may cut the eyes out at this time, or cut through both layers of felt together later when they are fused together. If you would like to make the mask reversible, leave the temple sections free of WonderUnder so you can insert the elastic between the felt layers.
- Position the two layers of felt together and fuse well, or pin together if not fusing.
- Cut out eyes through both layers and check for size, enlarge if necessary. If you haven’t fused the layers together you may wish to cut after sewing around the edges in Step 6.
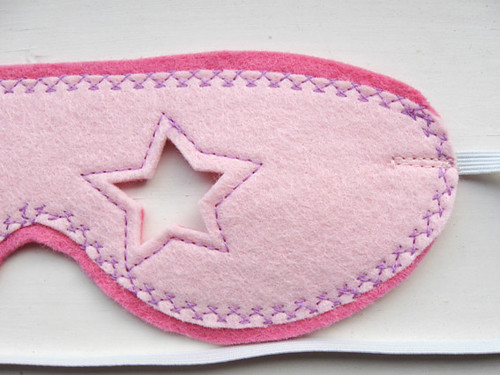
- Sew around outer edge of inner piece using either a decorative stitch, zigzag or plain straight stitch (see image above). This step prevents the felt from stretching when pulled tight by the elastic. Do the same for the eyes, particularly if you’ve gone for the stars, as they seem prone to being pulled out of shape. Next time I will draw in the stitching line around the stars instead of trying to do it freehand, and practice my decorative stitches around curves.
- Sew elastic in place on one side, adjust length to suit the desired head size, and sew the other side in a similar manner.
- Stand back and let your hero get on with saving the universe!
Looks pretty good to me Jacqui. I am thinking about doing the odd tutorial but not quite how to go about it so might have to come back to you for advice when I'm ready.
ReplyDeleteSo cute!!! I posted a link to your tutorial on Craft Gossip Sewing:
ReplyDeletehttp://sewing.craftgossip.com/tutorial-childs-superhero-mask-from-felt/2009/07/18/
--Anne
This is fantastic!! How clever. I may have to make a few of these up for my kid's and all my friend's kids. Thank you! Stacy
ReplyDeleteThis is wonderful! I am going to make these for my daughter!
ReplyDeleteMais oui Perrine! Let me know the link so I can have look at it in French! I can still read it fairly well but I'm sure my spoken is pretty funny these days :)
ReplyDeleteMy mom made a mask for each of my older children, and they turned out terrific! I hope you don't mind that I have linked to your tutorial on my blog. http://www.positivelysplendid.com/2011/01/quick-blissdom-recap-and-superhero.html
ReplyDeleteThanks so much for the tutorial. I was looking for an idea to make a mask to go with the cape and shirt I made for my granddaughter and this fit the bill perfectly!
ReplyDeleteso darling. makes me wish I had a girl. I'm thinking of making this one for the girls coming to my son's mid-October birthday party. Great take-home gifts for the goodie bags!!!
ReplyDelete