Showing posts with label sewing. Show all posts

10 January, 2015

Classic Baby Cardigan

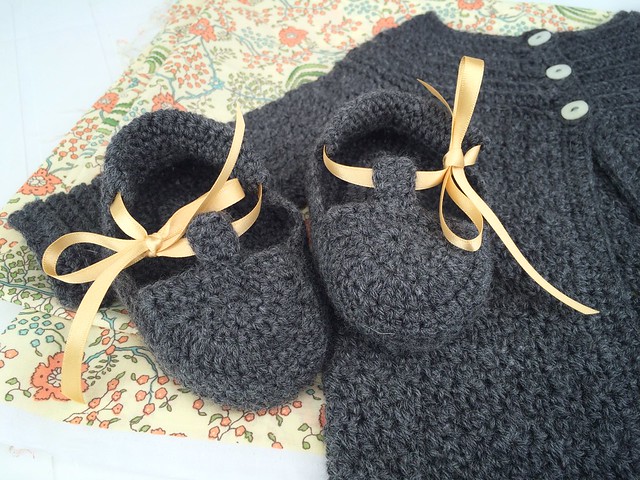
The first cardigan I made for my impending niece was the Classic Baby Cardigan by Lisa van Klaveren in the 12-18 month size. It's been done for ages so I can't actually even say what pattern I used for the booties! The cardigan has a kind of odd shape, very long across the yoke to the sleeves but since I don't have a tester baby to try it on I can't really say how it looks on but it's cute in the pattern photos! It's possible I did one too many ribs in the yoke, I found it hard to know when I'd done the right number of rows for some reason!

Baby cardigan and booties with a dress to come.

The only reason I haven't blogged it was that I needed some ribbon for the booties and I wanted it to match the dress I was going to make except I couldn't find any fabric I liked. I had a real Posy Gets Cosy outfit image in my mind and nothing matched! I finally found this pale yellow Japanese lawn at Spotlight the other day and it was the closest so far so I grabbed it.

Baby cardigan and booties with a dress to come.

 I'm using this retro Simplicity pattern for the dress (View A), again I had a mental image and short of ordering gorgeous French Citronille patterns I thought this was pretty close and it has the little Peter Pan collar and puffed sleeves I was after.


It's all cut out and ready to go - the question is whether I hold the parcel for it or send it on later? I'm scared if I hold the parcel the baby will be born by the time it gets there, but also scared if I don't hold it then the dress will be too small when I finally get around to sending it on! Of course, I could just sew the dress this weekend and send the parcel on Monday...

03 December, 2014

Scrappy colour

I'm at the start of a project for Christmas and have been a bit worried about my colour choices. I had started out with all reds and then had a sudden change of heart and went with oranges and pinks. Doing that always stresses me out because I start second-guessing myself; but as I was clipping corners off I looked down at my pile of scraps and realised that I think they look great together! I've got quite aways to go on this as there's nothing like adding patchwork to a simple object to make it an inordinate time suck, but at least I can relax with my colours.


Colourful scraps

02 November, 2014

Survived!

Hallowe'en is done and gone for another year and I got everything finished on time and didn't have a mental breakdown!

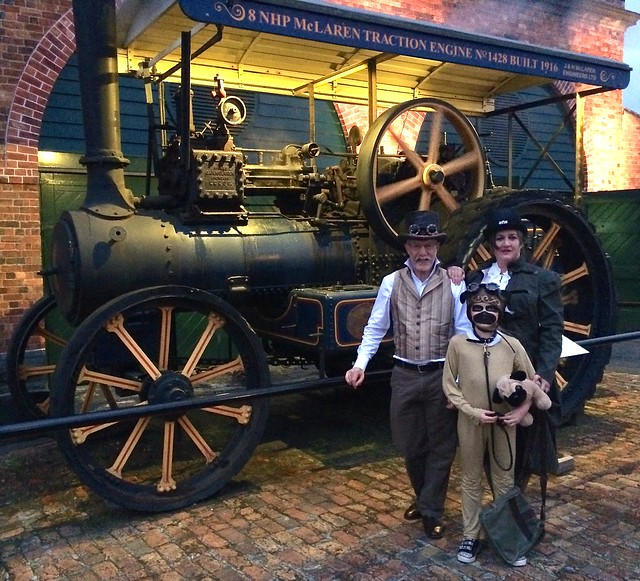
Here we are in all our steampunk glory
IMG_1918

Hazel got the most compliments on the night and was feeling pretty chuffed with her good idea! I think we might have done quite well in the costume competition but we didn't realize you had to sign up until it was too late - next year!

IMG_1847

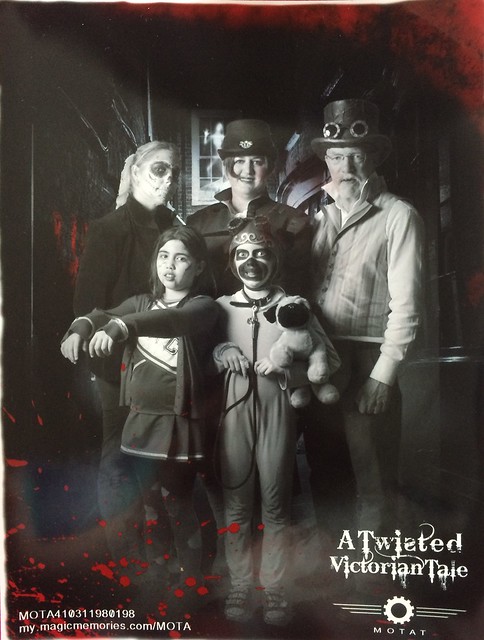
MOTAT was fun and there were some great costumes to admire and generally lots of people enjoying themselves which, to me, is what Hallowe'en is all about. There are other events to go to that have fireworks, rides or monster trucks but imho you can do that any time of the year and I doubt the vibe is anything special. Sure some of the venues fell rather flat, including a Alice in Wonderland one where most of the staff were on a break leaving the white rabbit not only late but on his own - possibly scary for him but not for anyone else! A bit more of a frisson of fear would have been good for the adults but Hazel and her friend Chloe the vampire/zombie cheerleader, were actually scared of being scared so were slightly on edge the whole time waiting for it to happen. When it did it was a group of teenage girls who had worked themselves into such a state of anticipation they gave themselves a fright over nothing and started screaming and running about, which freaked Hazel and Chloe out and made all the grown up ladies smile indulgently and remember when they were teenage girls in a state like that and how much fun it is!
IMG_1917

Just look at that demented steam pug, who says they're not scary?!

27 October, 2014

Hallowe'en frenzy

I'm not sure why I'm doing this to myself, I really don't! Every minute of every day I'm either working on costumes or thinking about costumes and I'm starting to panic. If only I hadn't lost a couple weeks to vertigo! But I guess if I didn't secretly enjoy it all I'd just give up wouldn't I?

Here is something finished, Mat's hat and goggles. Again, feeling the love for Rub 'n Buff. 


Still to go (because I need a list to really panic me):

•Mat's waistcoat (20% done)
•Hazel's top and bottom (dying leggings and top a disaster so need to make from scratch)
•Finish my skirt (just needs waistband and D-rings attached)
•Finish my jacket (attach lining at cuffs, put on 18 buttons)
•Finish spats (60% done)


25 October, 2013

Doll's Ripple blanket

I started this ripple blanket because I've always wanted to make one but didn't want a big (and expensive!) project, plus I thought I'd be able to use up a goodly amount of my left-overs from my granny square experiment. As it turns out I ended up buying another ball of pink and one of the light green, so I'm not sure I entirely succeeded on the 'using up' bit! I thought I had heaps but crochet uses up wool like it's going out of style. The pattern came from Cute & Easy Crochet, which my friend Jess gave me when I was in Canada, but it's a pretty standard pattern with three increase stitches and three decrease stitches to get the zigs and zags.

Ripple blanket

I really enjoyed doing this, it's fun switching colours so often and using such bright ones was cheering. I think a larger blanket would be somewhat garish, but it's fun in this size. Originally I was going to make the cushion as per the instructions but it was going to be really small so part way through I thought I'd make it a doll's blanket. But then I changed my mind because Hazel is, in her own words "not much of a doll girl" and it wouldn't get used, so I finished it off square. About a week later we got an invitiation to our young friend Samantha's third birthday party and the doll's blanket idea immediately sprang to mind because she IS a doll kind of girl, big time. She loves toting them about and putting them to bed, the whole nine yards. So out came the ripples again! You can tell I had to abandon my repeat of six colours but I think it's fine. If I did something like this again though, I'd start off random so that using up one colour wouldn't matter so much.

Ripple blanket

Here is the finished bed. Since she's a girl on the go I thought perhaps a portable arrangement would be good, and I found this laundry basket thing at the Warehouse. Nice and bright, lots of handles, and it fitted the blanket fairly well. I made a simple box mattress, two flat sheets (crisp white of course), and a comfy pillow. I would totally sleep in here myself if I fitted!


Doll's bed with ripple blanket

 I can't wait to give it to her on Sunday!

01 February, 2013

Scrappy Tripalong top finished

Oh my god being a puppy-mummy is hard work! Getting easier but still, not a lot of time for sewing because if Ollie doesn't need attention then Hazel does! It's going to be much easier when she goes back to school on Tuesday, but also a bit lonely. She's really looking forward to it though, starting Year 3, up to the Middle school, new room, new teacher, and a couple of good friends to keep her company.

I finished up the Scrappy Tripalong quilt top last night. It had stalled a bit when I discovered that at least two of the blocks were too small in one dimension to be used so I decided it would be better to just make a few more and use them than try and sort out the old blocks and made 8 more. As it turned out (of course), it was just the two blocks I'd initially identified that were a problem, so I have 8 more blocks to do something with! Hazel has asked to have this so there's no point in adding more to the quilt for a single bed. It's not perfect, there are some seams with a big of a jag between blocks, but it's so busy you can't really tell. I think the problem was one particular fabric that must have been on more of the bias than I realised, and has stretched a bit. I'm really picky about cutting on the bias but with vintage sheets it can be quite hard at times as they are cheaply made, and sometimes super-wonky - the weave doesn't run perpendicular to the selvedge, or even straight across in many cases, so sometimes I just had to say "f**k it" and cut however.

Scrappy Tripalong finished

I enjoyed making it, now I just have to make myself keep going and get it quilted. Not sure how well my machine will cope with it, it's the biggest thing I've made so far. I know I can do a smaller single but this might just be a bit too big for the throat of the machine. Very simple quilting ahoy! Of course I had some help with taking the photos...

Ollie helping take quilt photos

It's hard to get the colours to show up properly, it always seems to look darker than it really is. It's quite light and bright actually, more the top of the big photo than towards the bottom (which is probably a bit in the shade).

14 September, 2012

Lilla Handlebar Basket

Waaaay back in March I bought the Lilla Handlebar Basket pattern from Hemma design and ordered oilcloth and started out to make Hazel a basket. I got about 1/3 of the way in and it kind of fell by the wayside. There was a lot of gluing involved and I couldn't seem co-ordinate myself to do the gluing at times when I could let it dry and then get on to the sewing later. A couple weeks ago I had a fit of wanting to get some UFOs finished, and this was one of them (I still have too many to list here though).

One of the things that prodded me in to doing it was Hazel wanting to take stuffed animals with her on rides but not being able to since we've taken off the little doll's seat at the back of her bike. So for all your stuffed animal transport needs:

Untitled

If you look at the pattern photo, you'll see Hazel didn't want to mess with perfection in terms of which oilcloth we used, which was fine by me! I ordered mine from La Cuisine and it came super-fast. I've never used oilcloth before but it seems nice and it's not horrible and thick like I always think of oilcloth being. It sewed up really easily too, I was surprised that I had no issues with my foot sticking to it, and the needle went through easily. I had some tension issues, and the seams looked a bit untidy but other than on the flower at the front they aren't visible anyways so it didn't really matter. The pattern itself went together very nicely, even if there is a lot of gluing, but I had to do a bit of fiddling to make sure the lining pieces were the right size for the outer before committing myself with the glue! Parts of the lining were too small, and parts were a bit too big, and it's not like you can stretch or ease oilcloth to fit!


Untitled

She hasn't used it as a handbag yet, but I wouldn't recommend carrying heavy things in it, the handles are only held on with a narrow hem at the top. It's also a bit of a bitch to get on and off because the straps are very thick and don't bend easily.

30 July, 2012

Blue, white and red

Or is it red, white and blue? Hazel's school had a mini-Olympics on Friday - her class chose Great Britain as the country they would represent, and they were meant to wear blue, white or red clothes. I realised on Tuesday that she didn't have anything in those colours at all. I've had an old red cardigan of mine waiting to be repurposed for her for ages, so I offered to make that and a skirt and amazingly she accepted! I went through all my Ottobre books, and some of Cat's that I had borrowed, to find a cardigan pattern I could use when cutting down my old one. I ended up using the Daytime Dreamer pattern from the Spring 2011 issue...

Daytime dreamer pattern from Ottobre Spring 2011

and then did the skirt and the leggings as well! For the skirt I used some old fabric I had started making a dress out of years ago for my cousin's wedding, only to discover part way through that it was shrinking when ironed and was much too small! It's pretty awful fabric really, very stiff with no drape at all, but it works ok in a layered skirt like this. Alright, it sort of works, it's really too stiff and the skirt sticks out oddly sometimes but she doesn't care! If I were to do it again I'd use a knit fabric.

Untitled

It looks cute on and she was really pleased with the whole outfit. When it came time to finish the bottom edge of the cardigan she asked if I had to hem it up because it might be too short, so I suggested putting ribbon around it instead. She chose this one from Stitchbird and personally kissed every single animal on it. The sleeves were a bit too short in the end, even though I'd cut them longer than the pattern, so I re-attached the cuffs to them and it actually looks really good instead of a make-do situation! The cardigan fits beautifully, much better than I'd anticipated given the sometimes rather odd Ottobre sizing. Hazel usually comes out at least two sizes smaller for chest/waist/hips than her height which is what the pattern sizes are based on. Anticipating that, I cut a 116cm pattern but 122cm in length. The 116cm should have been on the large size given the measurements, but it's just right and in terms of length 122cm is a bit short. I think I should have cut 122cm wide (her height) and 128cm long. So who knows where she's at with Ottobre sizing at the moment!

Untitled

I'm feeling a little bleary this morning, having stayed up until 1am the last two nights watching the Olympics. I don't know what it is with them and me - every time the summer ones roll around I'm all "ho-hum" (I do get excited about the winter it has to be said) because I'm really not interested in watching sports on tv. But every time I get sucked in and find myself watching sports like weight-lifting or dressage (pretty ponies!) and really enjoying it. At 1am. The time difference between London and here couldn't be much worse it has to be said!

07 July, 2012

Negroni Shirt finished


Negroni Shirt, originally uploaded by Hazelnutgirl.

Wow, down to the wire! Mat's off to California for a conference in a few hours and I have only just hemmed the shirt and sewn on the buttons. So no photo of him IN the shirt until later, if he wants to be photographed that is!

Overall I'm fairly happy with it, but there are certain aspects I'm not thrilled with. The facings and collar aren't sitting nicely together and the outside of the yoke is slightly larger than the inside piece so it's slightly puffy-looking. The front facings don't sit nicely where they meet up with the yoke either. I'd need to make a few more to get an idea of whether that's me or the pattern or the fabric or a combination of all three! Probably the latter. It's amazing what pressing can do though!

Overall the style of the shirt is nice, although definitely slim-fitting. Mat's right on the upper range of the measurements for a medium - like he matched the numbers on the pattern exactly! Which is always a good sign in a pattern I think, because it indicates it's good for your proportions. There is an odd gap in the measurements though, with two inches in between all the size ranges, not sure what you're supposed to take from that. I did a tissue-fit that also suggested that the medium was good, particularly around the shoulders. However, the shirt turned out to be a bit slim through the body for him, which I fixed by letting out the side seams slightly (so no nice flat felling on them which is a pity!). The sleeves are also perhaps a skosh too short, but there's not much to be done there. If I make it again I'll cut a large on some pieces and a medium on others. I will also make a proper stand collar, this two-in-one version just doesn't thrill me.

The pattern itself is easy to follow, although the lack of clipping of curves is a puzzle. This isn't the only pattern that I've used recently that omits this rather essential step, nor the worst offender by far, and I can't understand how anyone can get a collar, or the curve on a facing around the neck, to sit nicely if the seam isn't clipped. What do you all think about that? Am I being needlessly pedantic over that step?

29 June, 2012

More Polaroids. Or, I am a doofus

Untitled


As the title says, more Polaroids! These ones were commissioned by Hazel, she wanted them for news (show and tell) at school on Friday. She chose the fabrics and nagged me until I made them. I thought I'd try making the sides a bit thinner and I think the proportions look good - but this is where the doofus part comes in. I've forgotten to take into account the seam allowance around the sides! I cut the strips half an inch thinner all 'round, so an inch on top and sides, and two inches for the bottom, and the 'photo' is 3.5 inches. I think it will still look fine with thinner sides, but damn! What if I'd decided, as I almost did, to trim another 1/4 inch off the sides and top? I think the title might have had more swear words in it ;) 

I'm planning on making these into a pillow or a bag or something like that, so will get a chance to evaluate the thinner proportions then. I think it would look quite good to have a variety of different shapes, because Polaroids (and the other makes) did come in quite different shapes and sizes, as well as different whites in the border.

I remember when I was a kid we used to find the left-overs from the kind that came out of the camera with a casing you had to peel off. People would just drop those on the ground after peeling them off and getting the photo (hey, it was the 70s!) and we loved finding them because there was a negative image on it, and you could see what the photograph had been of. Luckily for my young mind it was never anything more than people posing!

23 June, 2012

Another card wallet

Last year(ish) I made Mat a card wallet. He'd had a metal one in mind and was a bit...unenthusiastic about it at first, but came around to it to the point where he asked me awhile ago if I'd make another one for him to put his loyalty cards, store cards etc. in.

I used some fabric he really likes and he seemed pleased with it on reception (he'll be sporting patchwork vests before I'm done*).
card wallet
I used the tutorial over at Schlosser Designs again, it's super easy and very quick. It would have been quicker if I'd realised that I didn't have to cut separate sections for the back and pocket fronts because they're from the same fabric and form a continuous piece... The fabric is Robert Kaufmann something or other I think, and the circles are Metro something or other I think - I can be a bit more specific if anyone's dying to know!


*If anyone knows him I hope they'll find that image as funny (and unlikely) as I do.

19 June, 2012

Negroni WIP

You know it's dire when your dad reminds you you haven't updated your craft blog in awhile! I've been doing a bit of archaeology work for Mat, and a bit of sewing and a bit of cross stitch and nothing really bloggable in a cool way. But it's meant to be about the process too, so here is some process!

Mat's been asking me to make him another shirt for awhile, and when I saw the Negroni from Colette Patterns I thought it would make a nice change from the Kwik Sew 3422 pattern I've used previously (which is good but a bit more casual and boxy). I had this very nice lawn in the stash that I'd bought to make myself something with but Mat liked it and I thought it would be lovely with the pattern.


Negroni WIP

I've now finished the body and it's going together well, although I'm not entirely happy with the collar. I'm not sure what this type is called, with the collar and stand in one, but it's that kind.  With the way the shirt is constructed it looks very neat and tidy, but it's just not sitting nicely. I cleverly photographed it so that you can't tell, although if you look very carefully you can see how the upper part of the collar curves into the seam with the lapel, and then the lapel curves out again. Perhaps it will sit better when the sleeves are in, and I'll definitely top-stitch it, so it may work out in the end. If it doesn't then there is a tutorial about turning it into a standard collar which should solve the issues for next time, or I could just use a collar from another pattern. The fabric looks as nice as I'd hoped, and while light-weight is behaving itself.

Mat's off to a conference in Timaru at the end of the week and I'd like to have it finished by then, although it's going to be mighty chilly down there for a light shirt and he's digging out the heavy-duty winter woolies that haven't seen action since Canada the Xmas before last (we're soft and weak up here in Auckland, let's face it).

05 June, 2012

iPhone case

The Monday night quilt group's 'homework' for the meeting last night was an electronic device cover. Since I share the iPad with my husband and I don't think he'd be thrilled by a patchwork cover, I decided to make another iPhone slipcover.  I liked the one I made last year so much I used the same pattern, although this time I made it as one long piece and folded it in half instead of making two separate sides like the first one. Since it was homework I figured I'd better make an effort at some piecing rather than just use one bit of fabric like last time! I've been wanting to try postage stamps for awhile, and something this small seemed like place to try them out.

Untitled

The squares were 3 cm cut and 2 cm finished. And yeah, that's small! And yes the linen stretched. But actually all things considered, the squares generally matched up pretty well! I love all the reds and pinks against the linen, but couldn't resist putting in a single square of blue.

Untitled

I had a typical last-step disaster though - if you look carefully at the large red and white polka dot fabric you can see the red has leached into the white, as it has on the two smaller ones next to it - and they're from different manufacturers to boot. Argh! I used water-erasable pen to draw in the quilting lines, so before I gave it a last iron I sprayed them out and ironed it wet and the red ran! I'm not sure if it would be permanent, I bet it is since I effectively set it with a hot iron, but I might try washing the cover in warm water with a colour catcher. I thought that both of those fabrics had been pre-washed but perhaps not. Anyways, not impressed!

I made it just a few millimeters too tight, so had to hand-sew the sides up to make enough room. It was meant to be sewn together along those stitching lines you can see, which this time around are simply giving a bit of structure to the edges. It's such a tricky thing making a cover just the right size - not too big or the phone will slide out, not too tight or you can't get it out in time to answer a call! I like this style of cover though, because I can pinch the fabric at the bottom and the phone slides up and I can then pull it out. I can also press the home button through the fabric and slide up the phone a bit to just see the time, and there's nothing blocking the headphone jack at the top.

So now I have two covers, although I imagine I'll still be wandering around the house saying "has anyone seen my phone cover?".
30 May, 2012

Wonky log cabin pillow

I started this pillow a couple months ago in an attempt to use up some of the really neat scraps of fabric Lyndy sends along with fabric orders. I came across this brilliant little needlebook by Stitched in Color on Pinterest and thought yes!


                                                           Source: stitchedincolor.com via Hazelnuts on Pinterest


Well it started out like that and then turned into a cushion, but these things happen.

Untitled

I don't have huge amounts of small scraps really - I'm super-stingy when I cut things out so tend to end up with large scraps and I wanted to use up small ones. I easily had enough pink and red, less blues and fewer greens, so there are some non-scrap fabrics in those two colours. I decided to work on my wonkiness, which I always find hard. As you can see, I didn't manage to be hugely wonky, but dammit I didn't use a ruler or anything so it's wonky. The other problem I had was if things were too wonky then the block wouldn't lie flat. I'm not sure how you manage wonky and flat - are they somewhat incompatible?

Untitled

I quilted the front in a spiral, which exposed a gaping hole in my general world knowledge - how to draw a spiral.  If you look carefully you can see mine is a bit oval-shaped and not roundish. Why is that? Well I thought if I marked out concentric circles and then fudged it a bit it would turn into a spiral. Apparently not! Of course I looked it up afterwards and discovered the correct way to do it. I will remember that for next time! It looks kind of cool anyways, though I don't think I'd like to attempt it on anything larger on my little machine.

I quilted the back with wavy lines, which I'm now in love with. I told my husband I felt like I was driving the sewing machine with hands on either side moving the fabric side to side. He just looked at me like I was mad.

Untitled

I haven't had any feedback on it yet from most of the family, but one of us has made it her own.


Untitled

25 May, 2012

Real sewing

If you sew, do you find yourself doing a lot of this?

Untitled

I do. It's about my least favourite sewing job, but it's actually quite necessary at times, actually saves money, and it gets me in good with Mat. Clearly these jeans aren't his, they're Hazel's. Have you ever tried to hem a pair of size 7 super-skinny jeans? Challenging.

19 May, 2012

Brown Hexagons

I mentioned awhile back that I'd done a 'block you don't like in a colour you don't like' challenge for my Monday night modern quilt group. I decided to do hexagons because I really haven't felt the love for them at all, popular as they are; and I chose brown because although I don't mind it as a colour, I really don't like it in quilts. Brown hexagons. Blech. This is what I ended up with

Untitled

Although it wasn't explicitly stated, I think part of the reason we chose this challenge was to see if we could come to like something we might be prejudiced against for whatever reason. Now, I'm not entirely sure why I don't like hexagons much to be honest, I just don't. Someone suggested they might be too geometric, or precise and I think that's probably it in some deep subconscious way.

Brown, well I don't like brown in textiles much because I grew up in the 70s. Add some orange to that and you've got every childhood trauma right there. So of course I had to add in some orange. It didn't matter that it was Heather Ross orange either, because oh my I do not like this colour combination! Mat suggested after it was too late that green would have been a good background, and then I thought perhaps a paleish blue might have been good too, but it was too late and I'd already done all the quilting so wasn't going to change it. But I think perhaps it would soften the starkness of the brown against the white. I really need to stop using so much white as backgrounds.

So what do I like? Well I really like how I put the hexagons on (barring a few layout issues I can see now) with the negative space. And I really like how I quilted it.

Untitled

Basically I quilted on the hexagon shapes first, then appliqued the hexagons on. I left parts of the top unquilted, so both the quilting and the actual hexagons have a lot of empty spaces. In fact, I could happily take off the hexagons and just have the quilting! I also really enjoyed making the hexagons, it was satisfying and good for keeping hands busy while watching tv.

Verdict: I still don't like brown much, but I think it's possible that, used judiciously, I could come around the hexagons. Just not brown ones.

Untitled

15 May, 2012

I've lost my sewing mojo

I sort of let the KCWC posts slide on by, because other than the repurposed skirt, it was kind of a disappointment and it has dented my confidence! Well not in any serious way but it sort of sucked the joy out of clothes for the moment. It went like this - the Sunki tunic was too small so I went on to the next item which was a gauzy tunic from the Japanese book I got in Sydney. Very simple, with a drawstring waist and little ruffly cap sleeves. I did NOT make the mistake of just forging ahead based on measurements alone and the tissue fitting looked good.

I got this far


and then decided I should do a quick try-on just to make sure it was going to fit. I couldn't actually tell you if it fits or not because it wouldn't go over her head. Now I will admit that she is something like 100th percentile for head circumference (both her parents are serious fat-heads too) but I've never, ever had that problem before! There was no way I was going to undo this neck binding though


because it was an utter bitch to get on - gauze on the bias has a mind of its own - so what to do? At the momentI think the best solution is to make a opening at the back of the neck with a facing so I don't lose too much width. But I can't quite face it right now and feel a bit sulky.

Ok, so what next? Winter pyjamas! I got out the trusty Oliver + S Bedtime Story pyjama pattern and made up the pants using that pattern and cut up a couple of tshirts Mat hadn't liked to make the top. I even found some pink poodle iron-ons at Spotlight. Success?


No. "The sleeves are too looooonggg... and the pants feel funny...and they're too longggg...and the poodles are coming off and how come you didn't put the roses on instead like you said?" They aren't too long, it's just that she insists on pushing the front right down under her tummy and there are limits to how much I can compensate for that! You can see I already tried. I guess I'll just have to wait until it gets cold enough that she will swallow all these ridiculous protestations and wear them!

Anyways, I've given up on the ungrateful little so-and-so for the time being and I'm going to try and regain some mojo sewing up a Lisette Portfolio tunic for me. However, given my track record I have misgivings and doubts and fears that run something along these lines
  • Tunics on full-busted women can look like muumuus. I am full-busted
  • It may make me look pregnant. I am not, but my tummy isn't exactly flat at the moment
  • It will be too big - all the reviews say it has too much ease
  • It will be too small - I tissue-fitted it last night and it seemed like it will be only just big enough.
  • I can't make a muslin because I don't have almost 3m of anything other than the fabric I wanted for it in my stash.
  • I should line it so it sits over leggings nicely but I can't be bothered.
  • It will look awful but I'll wear it in public anyways because I can't bear to waste the effort and fabric.
  • I will look crap in any photos I take of myself in it to put up here.
I'll let you know how it all goes!


08 May, 2012

Group challenges

Well hello there! I didn't mean to take a break but somehow I did. I blame it on a slightly dismal end to KCWC (more on that later) and getting stuck in to painting the kitchen. But along with that I was slowly working away on a couple of challenges we set ourselves at our last modern quilt group meeting at The Little Craft Store (highly recommend it to anyone who hasn't been, 7-9pm first Monday of the month at the shop in Pt. Chev). The first one was to make a 'mug rug' in solids (what's wrong with saying coaster, does it have to have a ridiculous name just to make it sound less nana or something?), up to an A4 size. The second, which I'll blog when I've finished the binding, was to do a block you didn't particularly like in colours you don't particularly like. What do you think mine was?

I've been wanting to try half-square triangles for awhile now, so I thought I'd give those a go, but of course this being my first time I had to do them quite small. Not that they're really difficult or anything but I like to make things hard on myself and burn my fingers with the iron while pressing them. I wanted to do a gradation from one colour to another and I had this idea in my head. I didn't have quite the right solids but they weren't too bad. The yellow is a bit out of place, but I didn't have an inbetween orange and yellow colour. They grade from a medium red (they all look much darker in this photo) to a peachy pink, to salmon, to orange and then to lightish yellow.


Untitled

After I laid them all out I wasn't that thrilled with the sheer regularity of it all, it was too...clinical or sterile or something. I tried rotating a few squares around and in a way I liked it better but in the end I just left the one to break things up a bit. This is what my plan looks like next to the result

Untitled

I made a mistake colouring in in one strip, which still shows as faint pink. After awhile I began to wish that I'd done something like that instead of just using white, maybe having a very pale set of colours grading from one to another instead of the white. But I didn't have fabrics like that, and I wasn't actually going to do it all over again! Verdict: Ok, but I think I like things that are slightly less bitsy and repetitive. I do like solids though.

I had a few squares left over so I made a coaster.


Untitled

That's right - I called it a coaster. Am I kicked out of crafty blogging now?

25 April, 2012

KCWC Day 3

Big sigh. All that work and the great fabric and the Sunki tunic only fits if she stands completely straight and still.  I re-checked the measurements and she should just be within the 6/7 size range, but obviously this fits slim and more towards the lower end of the range of measurements. The sleeves are also a bit short. So. Dress goes next door to Abbie, who fits it, and I try again. This time I will also raise the bottom of the arm scythe as it's too low and causes the dress to lift when the arms are lifted. Boo-hoo. I'm pretty gutted about this, but serves me right for not tissue-fitting eh?

Luckily I also made up a skirt from an old shirt of mine, so the day wasn't completely wasted!

Untitled

It was so simple to do I almost hesitate to consider it 'sewing'! The shirt was a tunic-style one with a seam that ran around just under the bust, so I cut off the bottom half, folded over the top and put in some elastic. I didn't even have to hem it!

Untitled

I'm pleased she really likes it because the fabric is lovely, and buttery soft from age. I was kind of sad to give up on the shirt but to be honest it made me look pregnant and I had stopped wearing it almost a year ago. My stomach is a long way from its pre-baby flatness, but I don't need to make it look any larger than it is!

24 April, 2012

KCWC Day 2

Phew! This one was a bit of a mind-bender at times but got there in the end! It turned out there was heaps of the blue flowered fabric to do the Figgy's Sunki tunic, so even though I suspect it's a bit crisp for the pattern I couldn't resist the combination!

Figgy's Sunki tunic


Hazel hasn't tried it on yet, but I thought I could say a couple things about making the tunic because it's not the most straight-forward thing I've ever made. The tricky bits are the pockets that are set into the princess seams down the front. Unfortunately, the pattern illustration shows one piece a totally different shape than it is in reality which is extremely confusing, and the instructions are fairly brief. There is a further tutorial on the Figgy's site but that didn't really clarify things for me at all and I was in despair! Luckily I found Hemoglobinhummingbird's great tutorial on Flickr, had an "ah-HA!" moment and I was away. The rest of the tunic was pretty straightforward and even the pocket thing isn't that complicated once you have it straight in your head. One thing I did notice though is seam finishing happens in some places and not others - so you need to use your own initiative and finish the facings and some of the pocket areas for example. Same with curve-clipping. Not a biggie, but if you weren't paying attention and didn't do it in those spots, you might not be as happy with the finished result. The next time I do this I will also make the pockets deeper because they're quite shallow and Hazel was a bit put-out she couldn't get her whole hand into them.

I like the pleats in the sleeves - very 80s! I like to think Hazel will be wearing the Year 2 version of the power suit ;) You can see the effect the pleats have better on Angry Chicken's example. The overlap detail is neat too, although I couldn't find any reference in the pattern to sewing them down on each other, perhaps I'm just not reading it right - so I just sewed over the top stitching again.

Untitled


I'd like to try it again in a heavy knit I think, at the moment I'm thinking the fit might be a bit uncompromising in a fabric with no stretch like this one. Wouldn't it be great if it came in adult sizes though?!

ETA: Aaaah! It's too small! Noooo! All that work and the great fabric and it only fits if she stands completely straight and still.  I rechecked the measurements and she should just be within the 6/7 size range, but it's obviously a very slim fit and more towards the lower end of the range of measurements. The sleeves are also a bit short. So. Dress goes next door if they want it and it fits Abbie and I try again. I will also raise the bottom of the arm scythe as it's too low and causes the dress to lift when the arms are raised. Boo-hoo. I'm pretty gutted about this, but serves me right for not tissue-fitting eh?

LinkWithin

Related Posts with Thumbnails