Since I'm about to make the 'Lola Dress' for Hazel from a Japanese craft book I thought that I'd document the process for anyone out there who is wanting to give it a go themselves. I should preface this by saying that I'm not especially brave, or an incredibly experienced seamstress, or a whizz at diagrams, nor do I read a skerrick of Japanese. So if I can do it so can you! If you click through to the pictures on Flickr you'll find lots of notes that get specific about various parts of the pattern.
Well first off you need your book. Mine is Clothes for Girls, ISBN 4529044378 / 9784529044370 and I'm making Dress O
On the page opposite it says (in English) that the instructions are on p.58
So here we have the technical drawing of the dress, as well as the pattern layout which doubles as the list of pattern pieces you need. The two books I have come with giant fold-out pieces of paper with all the pattern pieces on them a la Burda Style or Ottobre.
Eeep! I hear you say. Oh yeah, I still feel that way when I open them out. Nothing like lots of lines and Japanese characters to freak your brain out :) If you'd like to understand the characters better I highly recommend the .pdf from Batty Chan which explains heaps. But do not panic! The little legend at the top of sheet B tells me that the pieces for O are in here somewhere
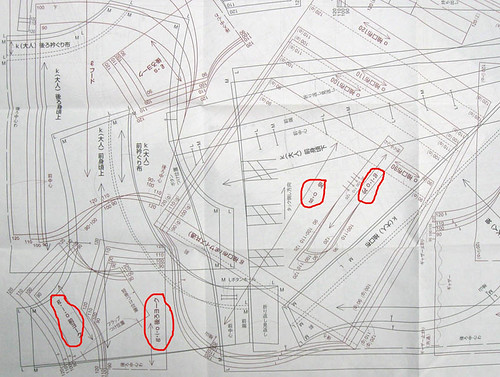
so I look for the English characters and eventually I see them. It seems that patterns G, I and O are fairly similar and on on the same pieces so that's what I focus in on. They're circled in red. Often they'll be roughly grouped together and in a slightly different colour than other pieces. It still takes some looking though! You know what pieces you need from the pattern layout diagram, and how many.
Here are the front and back a bit closer up. You can see that it's really quite easy to distinguish the various pieces once you know where they are. If you use Burda or Ottobre you'll be a pro at this already! In this picture I've noted some of the common symbols. Click over to Flickr to see them and more in note form.
Here are my pattern pieces, minus the collar, front band and cuffs because I misplaced them! You can see I've done them with newsprint. Not ideal but I could just see the lines through it. I used to have a big roll of Swedish tracing paper and if I'd known that Spotlight was going to stop carrying it I'd have bought 10! Anyways, newsprint was what I had at the time and it did the job.
Like Burda and Ottobre, there aren't seam allowances included on these patterns so you'll need to leave space around the pieces to add that. We'll cover that in the next post but generally it's 1 to 1.5cm and up to 3cm for hems. You can see it added in on mine. Remember to include all the little markings from the pattern, sometimes there can be quite a few depending on what you're making. I've also marked on the grain and where the pieces are cut on the fold (using more standard notation). I also include the letter and the size its for.


Can't wait to see the results. Oh, and you'll be making butterfly hairclips too, right? :)
ReplyDeleteOf course! Well buying them maybe... :)
ReplyDelete