30 June, 2012

Plaintain cross stitch

I started this cross stitch for the Emergency Crafting session, and finished it fairly soon after but kept forgetting to photograph it! It's from the Gerda Bengtsson book Danish Floral Charted Designs.

Gerda Bengtsson Plaintain


I'm doing another one of dandelions to match it, but I seem to have run out of steam somewhat, so it may take longer!

Amy of Seven-Stitches turns out to be a fellow Bengtsson admirer and told me that there was another of her books on Trade Me, and then I found another one, so now I have Book of Danish Stitchery and Laegeplanter og krydderurter i korssting  (Medicinal Plants and Culinary Herbs in Cross Stitch). The first book was fairly cheap as it's not in the best shape and not uncommon, but it looks like I got the second one for a pretty good price considering what it seems to go for in other listings I've just looked at! It's always nice when that happens :)

29 June, 2012

More Polaroids. Or, I am a doofus

Untitled


As the title says, more Polaroids! These ones were commissioned by Hazel, she wanted them for news (show and tell) at school on Friday. She chose the fabrics and nagged me until I made them. I thought I'd try making the sides a bit thinner and I think the proportions look good - but this is where the doofus part comes in. I've forgotten to take into account the seam allowance around the sides! I cut the strips half an inch thinner all 'round, so an inch on top and sides, and two inches for the bottom, and the 'photo' is 3.5 inches. I think it will still look fine with thinner sides, but damn! What if I'd decided, as I almost did, to trim another 1/4 inch off the sides and top? I think the title might have had more swear words in it ;) 

I'm planning on making these into a pillow or a bag or something like that, so will get a chance to evaluate the thinner proportions then. I think it would look quite good to have a variety of different shapes, because Polaroids (and the other makes) did come in quite different shapes and sizes, as well as different whites in the border.

I remember when I was a kid we used to find the left-overs from the kind that came out of the camera with a casing you had to peel off. People would just drop those on the ground after peeling them off and getting the photo (hey, it was the 70s!) and we loved finding them because there was a negative image on it, and you could see what the photograph had been of. Luckily for my young mind it was never anything more than people posing!

28 June, 2012

Star block

Untitled

The other night Cat was telling me a sad tale of a friend of hers in London who signed up for a bee with 18 people, and dutifully made everyone else's blocks, but when it came to her turn she got blocks from 3 other people. That is just tragic, but I'm assuming not uncommon? Anyways, Cat mentioned that she was collecting blocks from nice people to send over to her, and since she wanted stars and I was finishing up my blocks for the AMQG raffle quilt I made one. While the AMQG blocks are a small 9.5", this one is a nice generous 12.5" and SO much more fun to make for that reason! Took awhile though, those little stars are fiddly! The block comes from the Modern Blocks book. I had an awful time getting the final few seams to sit straight and even now I can see a few wobbles and mismatched seams.

I finally figured out why my point blocks are sometimes wider at the base than at the points - it's the bias stretching out in some fabrics. Phew. I was really beginning to worry about my seam allowances! I managed to keep a handle on it on the whole, though I can see one spot where it's not great. Any suggestions on how to avoid this?


27 June, 2012

Auckland Fabric-a-Brac


fabric-a-brac Auckland, originally uploaded by Hazelnutgirl.

Yay Auckland crafty peeps! Now we have our own Fabric-a-Brac and we don't have to feel all jealous of Wellington. I don't think I have enough fabric to justify a table for myself, but I will definitely be there to look at other peoples'!

Spread the word far and wide if you would, we need to maximise the amount of fabric we have to choose from ;)

26 June, 2012

Polaroids

I have three words for you - So. Much. Fun. I'm doing these for my Monday Night quilt group and the aim is to combine all our Polaroids into a quilt and do something altruistic with it. I'm so making some for me though! I think the proportions we decided on are a bit off though, the top and sides need to be thinner, but that's easily remedied if I can convince the others!

Polaroids WIP, originally uploaded by Hazelnutgirl.

It's a fairly random assortment of fabrics, and there are definitely more than the required one animal in my lot; but I discovered that when thinking about photo-like blocks I tend to choose fabrics with figures or objects in them, and not surprisingly, those turn out to include a fair number of animals! I've seen some lovely polaroids done with just geometric prints, like more regular quilting designs, and I'd like to try that way too.

23 June, 2012

Another card wallet

Last year(ish) I made Mat a card wallet. He'd had a metal one in mind and was a bit...unenthusiastic about it at first, but came around to it to the point where he asked me awhile ago if I'd make another one for him to put his loyalty cards, store cards etc. in.

I used some fabric he really likes and he seemed pleased with it on reception (he'll be sporting patchwork vests before I'm done*).
card wallet
I used the tutorial over at Schlosser Designs again, it's super easy and very quick. It would have been quicker if I'd realised that I didn't have to cut separate sections for the back and pocket fronts because they're from the same fabric and form a continuous piece... The fabric is Robert Kaufmann something or other I think, and the circles are Metro something or other I think - I can be a bit more specific if anyone's dying to know!


*If anyone knows him I hope they'll find that image as funny (and unlikely) as I do.

19 June, 2012

Negroni WIP

You know it's dire when your dad reminds you you haven't updated your craft blog in awhile! I've been doing a bit of archaeology work for Mat, and a bit of sewing and a bit of cross stitch and nothing really bloggable in a cool way. But it's meant to be about the process too, so here is some process!

Mat's been asking me to make him another shirt for awhile, and when I saw the Negroni from Colette Patterns I thought it would make a nice change from the Kwik Sew 3422 pattern I've used previously (which is good but a bit more casual and boxy). I had this very nice lawn in the stash that I'd bought to make myself something with but Mat liked it and I thought it would be lovely with the pattern.


Negroni WIP

I've now finished the body and it's going together well, although I'm not entirely happy with the collar. I'm not sure what this type is called, with the collar and stand in one, but it's that kind.  With the way the shirt is constructed it looks very neat and tidy, but it's just not sitting nicely. I cleverly photographed it so that you can't tell, although if you look very carefully you can see how the upper part of the collar curves into the seam with the lapel, and then the lapel curves out again. Perhaps it will sit better when the sleeves are in, and I'll definitely top-stitch it, so it may work out in the end. If it doesn't then there is a tutorial about turning it into a standard collar which should solve the issues for next time, or I could just use a collar from another pattern. The fabric looks as nice as I'd hoped, and while light-weight is behaving itself.

Mat's off to a conference in Timaru at the end of the week and I'd like to have it finished by then, although it's going to be mighty chilly down there for a light shirt and he's digging out the heavy-duty winter woolies that haven't seen action since Canada the Xmas before last (we're soft and weak up here in Auckland, let's face it).

07 June, 2012

Modern Patchwork

I was (and am!) a huge fan of Elizabeth Hartman's book 'The Practical Guide to Patchwork' so I was really excited when she put out a new one called 'Modern Patchwork'.

Image from Modern Patchwork by Elizabeth Hartman


However, the few advance glimpses of it didn't really get me as excited as I felt I should be, and I was a bit disappointed. However, I should have known that in any book review, the reviewer concentrates on the quilts they personally like, because there are only so many images you can show in a blog post! I got a digital review copy from C&T Publishing and yes there are quilts in it that I love, and no I'm not disappointed anymore - so let me show you the ones that really get me excited and tell you my plans for one of the patterns! And yes of course there are quilts in it I don't care for, but as the owner of far too many a few quilt books, I figure that if you love about half the quilts in a book then it's a good buy and I'm over the magic 50% with this book.

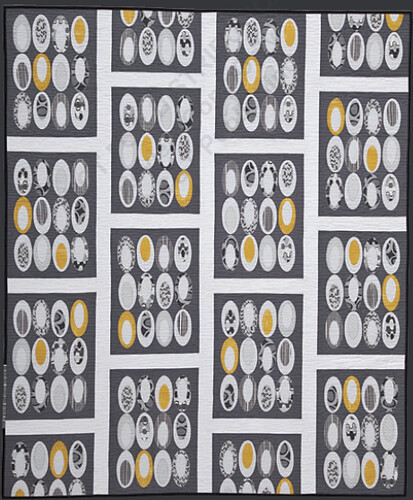
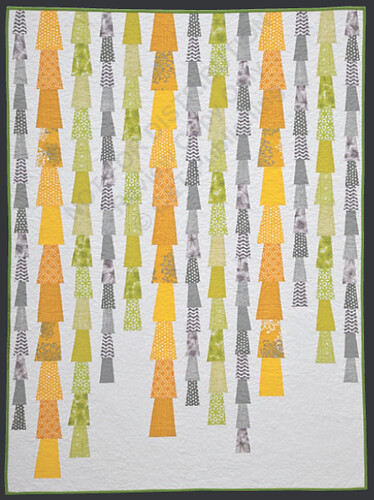
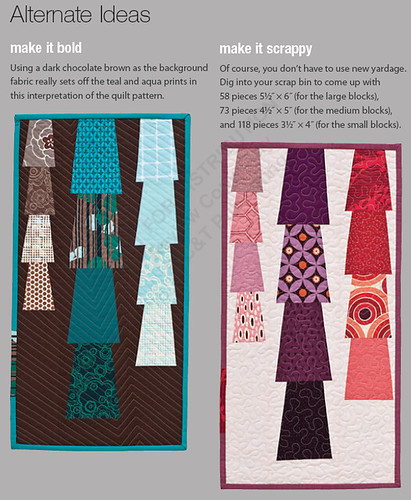
One of the things I loved about Elizabeth's first book was how she showed alternate ideas for the quilts and she's done the same thing here, which I'm really happy about! Although I'm getting better at looking past fabrics I don't care for to the block beneath, I still find it helpful when someone does it for me. This one is Glam Garlands, though I have to say that for some reason it looks more like trees in a forest to me! In this case however, I do like the yellows and greys a lot.

Image from Modern Patchwork by Elizabeth Hartman Image from Modern Patchwork by Elizabeth Hartman

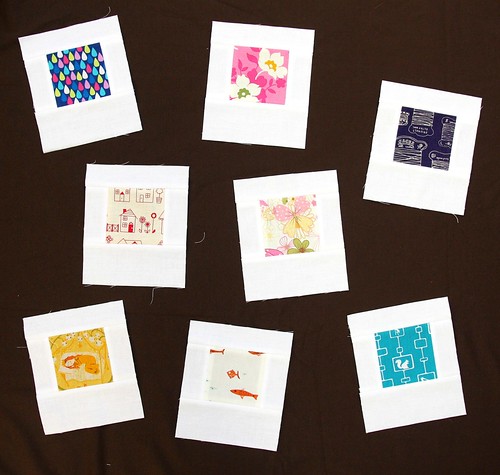
These little houses in Neighbourhood are cute, you could have a lot of fun with the fabric in the windows.
Image from Modern Patchwork by Elizabeth Hartman

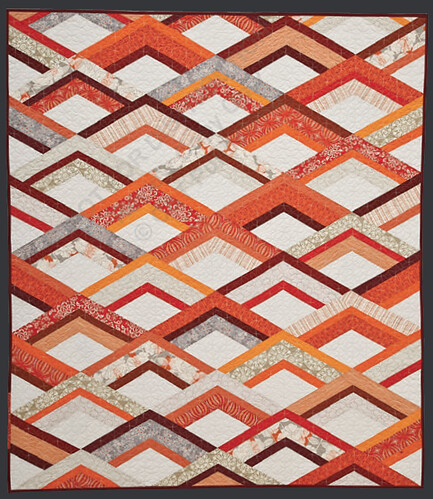
I also love this big geometric diamond quilt called Fire Drill, it's not so precise that it becomes what I dread in patchwork - too precise and geometric (take that hexagons!). Plus if you stare at it long enough it makes you go cross-eyed.

Image from Modern Patchwork by Elizabeth Hartman

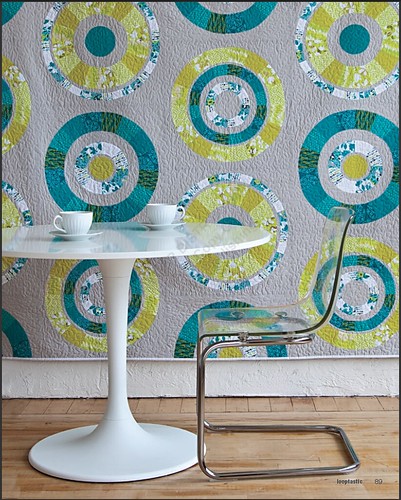
Two of the quilts I especially like feature curves. For some reason I'm paranoid about sewing curves, despite the fact I happily sew them when I'm making clothing! Irrational much? Anyways, these quilts are cunning because they're applique and for some reason that seems easier!

Image from Modern Patchwork by Elizabeth HartmanImage from Modern Patchwork by Elizabeth Hartman

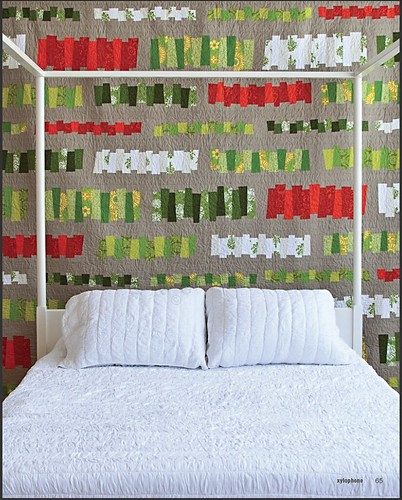
The one I've got plans for is this one, Zylophone

Image from Modern Patchwork by Elizabeth Hartman

The Monday night quilt group has been talking about doing a bee and I think I'm going to see if this one would work - and do it with my stash of vintage sheets. I've never been especially keen on bees because while I've seen some really great quilts done that way I've also seen some less than inspiring ones! But I think we've got such a great group that I'm happy to give it a go now. I'm not entirely sure how this would break down so that a group could do it, and we're only 8 or 9 people, but I only want a Queen size so I'd probably get at least half of it done for me? I need to sit down with the specs and really think it out - plus figure out how much it'll cost to get the sashing etc. Quilts are so spendy, even if you have half the fabric already and I'm too much of a control freak to not supply the background and most, if not all, the fabrics!

05 June, 2012

iPhone case

The Monday night quilt group's 'homework' for the meeting last night was an electronic device cover. Since I share the iPad with my husband and I don't think he'd be thrilled by a patchwork cover, I decided to make another iPhone slipcover.  I liked the one I made last year so much I used the same pattern, although this time I made it as one long piece and folded it in half instead of making two separate sides like the first one. Since it was homework I figured I'd better make an effort at some piecing rather than just use one bit of fabric like last time! I've been wanting to try postage stamps for awhile, and something this small seemed like place to try them out.

Untitled

The squares were 3 cm cut and 2 cm finished. And yeah, that's small! And yes the linen stretched. But actually all things considered, the squares generally matched up pretty well! I love all the reds and pinks against the linen, but couldn't resist putting in a single square of blue.

Untitled

I had a typical last-step disaster though - if you look carefully at the large red and white polka dot fabric you can see the red has leached into the white, as it has on the two smaller ones next to it - and they're from different manufacturers to boot. Argh! I used water-erasable pen to draw in the quilting lines, so before I gave it a last iron I sprayed them out and ironed it wet and the red ran! I'm not sure if it would be permanent, I bet it is since I effectively set it with a hot iron, but I might try washing the cover in warm water with a colour catcher. I thought that both of those fabrics had been pre-washed but perhaps not. Anyways, not impressed!

I made it just a few millimeters too tight, so had to hand-sew the sides up to make enough room. It was meant to be sewn together along those stitching lines you can see, which this time around are simply giving a bit of structure to the edges. It's such a tricky thing making a cover just the right size - not too big or the phone will slide out, not too tight or you can't get it out in time to answer a call! I like this style of cover though, because I can pinch the fabric at the bottom and the phone slides up and I can then pull it out. I can also press the home button through the fabric and slide up the phone a bit to just see the time, and there's nothing blocking the headphone jack at the top.

So now I have two covers, although I imagine I'll still be wandering around the house saying "has anyone seen my phone cover?".

LinkWithin

Related Posts with Thumbnails